


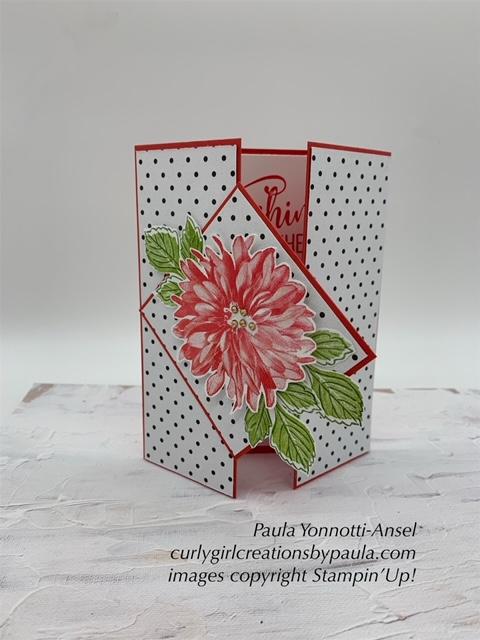
Dahlia Days Birthday Card
I love how the Dahlia Days Stamp Set has so much depth. For this card I used the following:
Basic White 5 1/4 x 4 for the inside greeting, the cutout and the front greeting
Dahlia Days Stamp Set
Detailed Dahlias Dies
In Your Words Stamp Set
Magenta Madness Ink
Granny Apple Green Ink
Pretty Flowers Embossing Folder
2020-2022 In Color Enamel Dots
Using the big die from the Detailed Dahlia set I cut it in half diagonally for the front of the base card. After I stamped the Dahlia's I ran those through the Stampin' Cut & Emboss Machine using the Pretty Flowers Embossing folder to give the flowers some depth. I love the way it brings spring into our now dreary winter days!


I love our new Ever Eden Designer Series Paper
Here is what I used to make this simple card:
For the base I used Soft Succulent 8 1/2 X 5 1/2 scored at 4 1/4
The Designer Series Paper is Ever Eden 5 1/4 by 4
For the stamp set I used Forever Fern - ink colors Evening Evergreen, Highland Heather, and Cinnamon Cider
To cut the ferns out I used the Forever Flourishing Dies
Use Basic White for the greeting
The ribbon is Soft Succulent
The embellishments are Genial Gems
The inside is blank using Basic White Paper 5 1/4 X 4
You can use any greeting you would like
Try this simple card, you will love the Designer Series Paper and color combination!

April 2021 Paper Pumpkin Alternative Cards
April's Paper Pumpkin was such a fun kit. I have attached a few alternative cards for you to case. Using some other card stock for my bases I made additional fun cards. I used Blackberry Bliss, Coastal Cabana, Granny Apple Green and Basic White for my additional bases. From there I just used the stamp and additional items in my kit! I hope you like the additional cards.
If you would like to sign up for Paper Pumpkin, just click the link below!


Snow Front Holiday Card!

Materials used for this card are:
- Snow Front Stamp Set on page 58 of the Annual Catalog
- Night of Navy Cardstock
- Snowflake Splendor Designer Series Paper on page 37 of the 2020 Mini Catalog
- Whisper White Cardstock
- Balmy Blue Cardstock
- Balmy Blue Ink
- Espresso Ink
- Shaded Spruce Ink
- Soft Suede Ink
- Real Red Ink
- White embossing powder

2021 is right around the corner!!

- For the base use Whisper White card stock - 4 1/4 x 11 scored at 2 3/4 and 5 1/2
- Then cut a piece of Whisper White card stock for the stand up panel - 4 1/4 x 5 1/2
- For the matting cut 3 pieces of Smoky Slate card stock - 4 x 5 1/4, 3 1/4 x 3 1/4 and 3 1/4 x 21/2
- I love the Peony Garden Designer Series Paper with its soft soothing colors: Cut 3 pieces 4 x 5 1/4, 3 3/4 x 5 and 3 1/8 x 4.
- I used the Peony Dies to create the flower in Petal Pink and for the leaves Mossy Meadow and Pear Pizzazz.
- Once all of the pieces are cut it's time to assemble:
- Using your bone folder fold at the scored lines.
- Glue the panel to the scored piece remembering to only glue on the bottom part of the panel.
- The rest is easy, just follow the picture to add your matting, designer series paper and flower.
- One last note, when putting the post it note pad on, score the 3 1/8 x 4 designer series paper at 3 1/8 and then fold over the pad and adhere to the back before putting it on your matting!
Subscribe to:
Comments (Atom)
.jpg width=)


Social Icons